Automation guide
AI UV unwrapping in Blender, and why seam placement is the hard part
AI UV unwrapping in Blender versus Smart UV Project and manual seams. Which method to use, how to check texel density, and where automation stops.
Unwrapping is two jobs, not one, which is why "AI UV unwrapping" promises more than any tool delivers. Cutting the seams is a judgement about where a visible discontinuity is acceptable. Flattening the islands is solved maths. Mixar automates the second half completely and gives the agent sixteen tools for the work around the first, which is the honest division of labour rather than a claim to have solved seams.
(Mixar is a 3D editor built on Blender, with the toolset, shortcuts and .blend compatibility unchanged and an AI agent running inside the application. If you know Blender you already know most of it.)
Below is what Blender's unwrap methods actually do, how to place seams so the flattening has a chance, and exactly where the automation takes over.
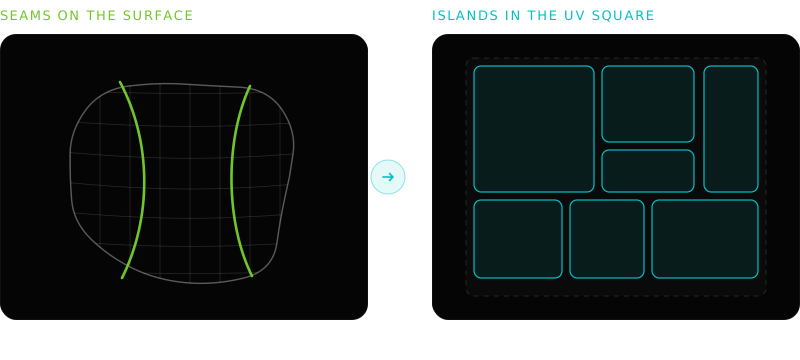
The two halves of the job#
Seams. A UV island is a piece of surface cut free and laid flat. Every cut is a discontinuity: texture detail cannot cross it smoothly, normals can show a shading break at it, and a bake will have a margin bleed there. So seams belong where they will not be seen: inside a shape, along a natural edge of the object, under an arm, behind a hinge, along a panel line. That is an aesthetic and pipeline judgement about how the asset will be viewed.
Flattening. Given the cuts, produce a 2D layout that minimises distortion. This is a well-understood optimisation problem and Blender solves it competently.
Anything marketed as automatic unwrapping is mostly doing the second and guessing at the first.
Blender's unwrap methods#
U in Edit Mode brings up the unwrap menu. The options that matter:
Angle Based. The default. Prioritises preserving angles, which keeps shapes recognisable and texture detail undistorted, at the cost of some area distortion. Right for almost everything.
Conformal. Prioritises conformality more aggressively. Faster, and it can produce better results on simple, largely developable surfaces. It tends to produce more area distortion on organic shapes.
Minimum Stretch. Added in more recent Blender versions, this trades some angle preservation for lower overall stretch. Worth trying when Angle Based leaves visible stretching on a curved surface.
Smart UV Project. Not really an unwrap method: it is an automatic seam generator plus an unwrap. It splits the mesh by face angle using the Angle Limit setting and unwraps the pieces. It is genuinely useful and it produces a lot of small islands with a lot of seams, which is fine for lightmaps and for props that will only ever have generated textures, and bad for anything painted across.
Cube, Cylinder, Sphere Projection. Direct projections. Right when the shape actually is one of those, wrong otherwise.
Follow Active Quads. Extends the UV layout of one face along a quad grid. The correct tool for pipes, roads, corridors and anything that should have uniform texel density along a run. Underused.
Placing seams that do not show#
The rules that hold up in practice:
- Follow the shape's natural breaks. Where a real object would have a seam, a panel gap, a hem, an edge, put a UV seam. Nobody notices a texture discontinuity where the object already has one.
- Hide seams from camera. Undersides, insides, backs. If the asset has a defined hero angle, put nothing on it.
- Cut where curvature is high. A sharp edge already breaks shading, so the seam costs less there.
- Do not cut across a flat continuous surface. That is exactly where the discontinuity will read.
- Cut enough. Under-seaming produces stretching, and stretching is more visible than a well-placed seam. People are far too reluctant to add seams.
- Think about the layout, not just the cuts. Islands that will be painted together should sit near each other.
Blender's UV editing documentation covers the mechanics. Ctrl+E > Mark Seam on selected edges, and Select > Select All by Trait > Sharp Edges gets a useful starting selection on hard-surface models.
Checking the result#
Unwrapping is not done when the islands exist. Three checks:
Stretching. In the UV editor, turn on Display Stretch in the overlay options. Angle mode shows angular distortion, Area mode shows relative area distortion, and they catch different problems: angle distortion skews texture detail, area distortion changes effective texel density across one island. Blue is good, red is not. Fix by adding seams, not by nudging vertices, because nudging trades one distortion for another rather than removing it.
Texel density. Texture pixels per unit of surface area, and it needs to be consistent across an asset and ideally across a project. Inconsistent density means one part of the model is sharp and another is soft at the same resolution, which reads as a mistake even to people who cannot name it.
Common targets, useful as a starting point rather than gospel:
| Asset role | Texel density | 1m cube needs |
|---|---|---|
| Background, distant | 256 to 512 px/m | 512 to 1K map |
| Standard prop | 1024 px/m | 2K map |
| Hero, camera-facing | 2048 px/m and up | 4K map |
The point is not the number, it is picking one per project and holding every asset to it. A checker texture makes drift visible instantly: apply one and look for squares that change size across the model, or between models sitting next to each other.
Packing. UV > Pack Islands. The margin has to survive two things: the bake margin bleeding colour outward, and mipmapping averaging neighbouring pixels together at lower levels. A practical rule is roughly 1 pixel of margin per 256 pixels of map, so 4px at 1K, 8px at 2K, 16px at 4K. Too tight and islands cross-contaminate at distance, which shows up as coloured fringing on a shrinking object and is maddening to diagnose later. Rotation on usually improves fill ratio; turn it off when the pipeline needs axis-aligned islands.
Overlaps. Fatal for baking, fine and intentional for tiling or mirrored assets. Select > Overlap in the UV editor finds them. Know which case you are in before you fix it.
Where automation actually helps#
Given the split above, the useful framing is: automate the flattening, the packing, the density check and the whole surrounding sequence, and treat seam placement as assisted rather than automatic.
That is roughly where things stand. Smart UV Project automates seam generation for cases where seam count does not matter. For cases where it does, the honest answer today is that an artist or an agent following a stated rule ("seams on the underside and along the panel lines, keep the front face uncut") beats a purely geometric heuristic.
What an agent removes is everything around the unwrap:
Check the input
Transform applied, mesh manifold, no stale UV map already sitting on the object.
Unwrap
Angle Based unless you said otherwise, following whatever seam rule you stated.
Pack
With a margin that suits your texture size and mip chain, not a default.
Verify
Applies a checker material, measures texel density, and reports where the stretching is worst.
Unwrapping in Mixar is reachable two ways, and which you want depends on whether the unwrap is the job or a step inside one.
The direct operation
UV Unwrapping runs on the selected mesh from the sidebar. Reach for it when the mesh is ready and the unwrap is the only thing you want.
The agent
Sixteen UV tools: unwrap, smart project, project from view, island packing and stacking, UV space usage, texel density measurement and selection by density, UDIM tile moves, overlap counting, orientation validation. Brief it when the unwrap sits inside a longer pass.
The sequence in practice#
- Clean the mesh. Applied transform, no doubles, no loose geometry, correct normals. The cleanup checklist covers this.
- Mark seams, or brief the agent with the rule you want followed.
- Unwrap with Angle Based unless there is a reason not to.
- Check stretch with the overlay.
- Add seams where stretch is high, unwrap again.
- Pack with an appropriate margin.
- Verify texel density with a checker.
- Only then texture or bake.
Steps 1, 3, 6 and 7 are mechanical. Step 2 is the job. Steps 4 and 5 are a loop that terminates when someone looks at it.
Why this matters more than it seems#
Every downstream step inherits UV quality. Generated PBR maps are applied through UVs, so bad UVs produce bad textures no matter how good the generator is, which is covered in the AI texture generator guide. Bakes fail outright on overlapping UVs, per automating baking in Blender. Lightmaps need their own non-overlapping set. Getting the unwrap right is cheap; discovering it was wrong after texturing is not.
That dependency is why unwrapping is worth briefing as part of a sequence rather than running alone. The AI agent for Blender pillar covers the passes either side of it.
Frequently asked questions
Can AI do UV unwrapping in Blender?
Partly. The flattening and packing steps are automated well, and have been for years through Blender's own unwrap solvers. The part that resists automation is seam placement, because where a seam belongs is a judgement about where a visible discontinuity is acceptable on that particular asset. Expect automation to handle everything around the seams and to need direction on the seams themselves.
What is the difference between Angle Based and Conformal unwrapping?
Angle Based preserves angles across the surface, which keeps texture detail undistorted and shapes recognisable, at some cost in area accuracy. Conformal is faster and can give cleaner results on simple developable surfaces, but tends to distort area more on organic shapes. Angle Based is the right default for most meshes.
Is Smart UV Project good enough?
It depends on the asset. Smart UV Project generates seams from face angle, which produces many small islands and many seams. That is fine for lightmaps, for background props and for anything textured only by generated maps. It is a poor choice for assets that will be painted across, because every seam is a place the paint cannot flow.
How do I check texel density in Blender?
Apply a checker texture and look at the model: squares that change size between parts of the mesh mean the density is inconsistent. In the UV editor, the Display Stretch overlay shows angular and area distortion directly. Both checks take seconds and both catch problems that are expensive to fix after texturing.
What is the fastest way to unwrap and pack a batch of props?
Brief the whole sequence rather than running each operator per object: check the transform is applied, unwrap, pack with a margin suited to your texture size, then verify density with a checker. Mixar, a 3D editor built on Blender, exposes unwrapping both as a direct operation on the selected mesh and as an agent tool set covering packing, stacking, texel density and overlap checks across a whole file.